[Android] Room 활용하여 데이터 읽기, 삽입, 삭제, 수정 - (1) 삽입, 읽기
[Android] Room + LiveData + ViewModel + DataBinding 사용하여 MVVM 패턴 사용하기
2021.04.19 - [안드로이드/AAC, MVVM] - [Android] 안드로이드 AAC & MVVM [Android] 안드로이드 AAC & MVVM 액티비티, 프래그먼트에 너무 많은 코드를 넣게 되면 점점 무거워져 다루기 힘들어지게 된다. 앱이 카..
hanyeop.tistory.com
저번에는
MVVM 패턴으로 데이터를 삽입하고 읽는 것을 간단하게 구현해보았다.
이번에는 새로 프로젝트를 만들어 데이터를 리싸이클러뷰에 출력하여 관리할 수 있는 형태로 만들어보고자 한다.
사용해보기
0️⃣ 기본 세팅 (데이터베이스 생성, 레이아웃 설정)
종속성 추가
plugins {
    id 'kotlin-kapt'
}

android {
    buildFeatures {
        dataBinding true
    }
}


dependencies {
  def room_version = "2.3.0"
      // room
      implementation "androidx.room:room-runtime:$room_version"
      kapt "androidx.room:room-compiler:$room_version"
      // room 코루틴
      implementation "androidx.room:room-ktx:$room_version"

      def lifecycle_version = "2.3.0"
      // ViewModel - 라이프 사이클
      implementation "androidx.lifecycle:lifecycle-viewmodel-ktx:$lifecycle_version"
      // LiveData - 데이터의 변경 사항을 알 수 있음
      implementation "androidx.lifecycle:lifecycle-livedata-ktx:$lifecycle_version"
    }
플러그인에 kapt, android에 데이터바인딩, 종속성에 뷰모델, 라이브데이터, 룸을 추가해준다.
2021.05.12 - [안드로이드/AAC, MVVM] - [Android] Room 활용하여 데이터 저장하기
[Android] Room 활용하여 데이터 저장하기
안드로이드에서는 로컬 DB에 데이터를 저장하기 위해 SQLite를 지원한다. 허나 SQLite는 사용하기 복잡하여 어렵기 때문에 SQLite에 대한 추상화 레이어를 제공하는 Room 라이브러리를 지원한다. 2021.0
hanyeop.tistory.com
Room의 요소와 설명은 이 글에서 다뤘으므로 생성하는 부분은 간단히 작성하겠다.
엔티티 생성
@Entity(tableName = "user_table")
data class User(
    // autoGenerate = true , 자동으로 PrimaryKey 생성해줌
    @PrimaryKey(autoGenerate = true)
    val id : Int,
    val name : String,
    val age : Int
)
Dao 생성
@Dao
interface UserDao {

    // OnConflictStrategy.IGNORE = 동일한 아이디가 있을 시 무시
   @Insert(onConflict = OnConflictStrategy.IGNORE)
   suspend fun addUser(user : User)

   @Query("SELECT * FROM user_table ORDER BY id ASC")
   fun readAllData() : LiveData<List<User>>

}
데이터베이스 생성
/* entities = 사용할 엔티티 선언, version = 엔티티 구조 변경 시 구분해주는 역할
   exportSchema = 스키마 내보내기 설정 */
@Database(entities = [User::class], version = 1, exportSchema = false)
abstract class UserDatabase : RoomDatabase() {

    abstract fun userDao() : UserDao

    companion object{
        /* @Volatile = 접근가능한 변수의 값을 cache를 통해 사용하지 않고
        thread가 직접 main memory에 접근 하게하여 동기화. */
        @Volatile
        private var instance : UserDatabase? = null

        // 싱글톤으로 생성 (자주 생성 시 성능 손해). 이미 존재할 경우 생성하지 않고 바로 반환
        fun getDatabase(context : Context) : UserDatabase? {
            if(instance == null){
                synchronized(UserDatabase::class){
                    instance = Room.databaseBuilder(
                        context.applicationContext,
                        UserDatabase::class.java,
                        "user_database"
                    ).build()
                }
            }
            return instance
        }
    }
}
Repository 생성
// 앱에서 사용하는 데이터와 그 데이터 통신을 하는 역할
class UserRepository(private val userDao: UserDao) {

    val readAllData : LiveData<List<User>> = userDao.readAllData()

    suspend fun addUser(user: User){
        userDao.addUser(user)
    }
}
뷰모델 생성
// 뷰모델은 DB에 직접 접근하지 않아야함. Repository 에서 데이터 통신.
class UserViewModel(application: Application) : AndroidViewModel(application) {

    private val readAllData : LiveData<List<User>>
    private val repository : UserRepository

    init {
        val userDao = UserDatabase.getDatabase(application)!!.userDao()
        repository = UserRepository(userDao)
        readAllData = repository.readAllData
    }

    fun addUser(user : User){
        viewModelScope.launch(Dispatchers.IO) {
            repository.addUser(user)
        }
    }

    // ViewModel에 파라미터를 넘기기 위해서, 파라미터를 포함한 Factory 객체를 생성하기 위한 클래스
    class Factory(val application: Application) : ViewModelProvider.Factory {
        override fun <T : ViewModel?> create(modelClass: Class<T>): T {
            return UserViewModel(application) as T
        }
    }
}
데이터베이스의 요소들을 생성하고 리스트 읽기, 추가 메소드만 미리 작성하였다.
레이아웃 설정
<?xml version="1.0" encoding="utf-8"?>
<layout xmlns:android="http://schemas.android.com/apk/res/android"
    xmlns:app="http://schemas.android.com/apk/res-auto"
    xmlns:tools="http://schemas.android.com/tools">

    <data>

    </data>

    <androidx.constraintlayout.widget.ConstraintLayout
        android:layout_width="match_parent"
        android:layout_height="match_parent"
        android:orientation="vertical"
        tools:context=".MainActivity">

        <androidx.recyclerview.widget.RecyclerView
            android:id="@+id/recyclerView"
            android:layout_width="match_parent"
            android:layout_height="match_parent"
            app:layout_constraintBottom_toBottomOf="parent"
            app:layout_constraintEnd_toEndOf="parent"
            app:layout_constraintStart_toStartOf="parent"
            app:layout_constraintTop_toTopOf="parent" />

        <com.google.android.material.floatingactionbutton.FloatingActionButton
            android:id="@+id/floatingActionButton"
            android:layout_width="wrap_content"
            android:layout_height="wrap_content"
            android:layout_marginEnd="20dp"
            android:layout_marginBottom="20dp"
            android:clickable="true"
            android:focusable="true"
            android:onClick="onFabClicked"
            app:layout_constraintBottom_toBottomOf="parent"
            app:layout_constraintEnd_toEndOf="parent"
            app:srcCompat="@android:drawable/ic_input_add" />

    </androidx.constraintlayout.widget.ConstraintLayout>
</layout>
리싸이클러뷰로 데이터를 표시해주고, Fab 으로 요소를 추가할 수 있도록 하려고 한다.
fab에 focusable 를 추가하면 버튼처럼 눌리는 효과를 준다.
추가 창은 다이얼로그로 띄울 것이며 커스텀 다이얼로그 방법은
2021.05.19 - [안드로이드/기본] - [Android] 액티비티 팝업으로 띄우기 (Custom Dialog)
[Android] 액티비티 팝업으로 띄우기 (Custom Dialog)
위와 같이 특정 형태의 액티비티를 팝업창으로 띄우기 위해서는 Dialog를 커스텀해야한다. 사용해보기 레이아웃 만들기 사용하고 싶은 형태의 레이아웃을 하나 만들어준다. 클래스 생성 class Custo
hanyeop.tistory.com
에서 다루었다.
1️⃣ 데이터 삽입하기 (Insert)
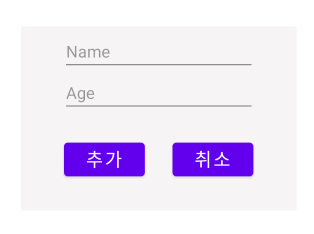
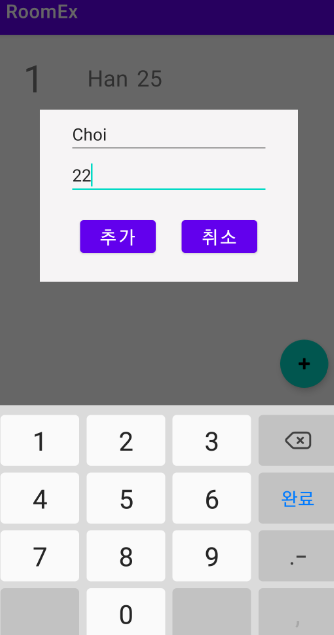
다이얼로그
// 추가 버튼 클릭 시 onAddButtonClicked 호출 후 종료
        addButton.setOnClickListener {

            val name = nameText.text.toString()
            var age = ageText.text.toString()

            // 입력하지 않았을 때
            if ( TextUtils.isEmpty(name) || TextUtils.isEmpty(age) ){
                Toast.makeText(context, "데이터를 입력해주세요.", Toast.LENGTH_SHORT).show()
            }

            // 입력 창이 비어 있지 않을 때
            else{
                customDialogInterface.onAddButtonClicked(name, Integer.parseInt(age))
                dismiss()
            }
        }
다이얼로그에서 TextUtils 으로 텍스트 입력여부를 체크하고 onAddButtonClicked 에 넘겨준다.
메인액티비티
override fun onCreate(savedInstanceState: Bundle?) {
        super.onCreate(savedInstanceState)
        binding = DataBindingUtil.setContentView(this,R.layout.activity_main)

        userViewModel = ViewModelProvider(this,UserViewModel.Factory(application)).get(UserViewModel::class.java)
    }
뷰모델을 연결해주고
// 다이얼로그에서 추가버튼 클릭 됐을 때
    override fun onAddButtonClicked(name : String, age : Int) {
        val user = User(0,name,age)
        userViewModel.addUser(user)
        Toast.makeText(this, "이름 : $name , 나이 : $age 추가", Toast.LENGTH_SHORT).show()
    }
다이얼로그에서 이름과 나이를 받아와 뷰모델의 addUser 메소드를 호출해준다.

실행하여 임의의 데이터를 추가해본 후,
2020.09.10 - [안드로이드/기본] - [Android] 안드로이드 스튜디오 SQLite Database 경로(위치)
[Android] 안드로이드 스튜디오 SQLite Database 경로(위치)
안드로이드 에뮬레이터를 켠 상태로 Device File Explorer를 누르면 나오는 화면에서 으로 들어가게 되면 DB정보가 있다. 이곳에 DB를 붙여넣거나 삭제할 수 있으며, DB의 정보를 확인하고 싶다면 Save
hanyeop.tistory.com
위와같이 데이터베이스를 조회해보면
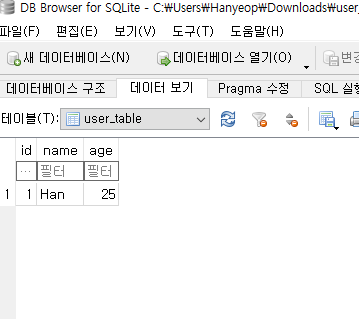
잘 추가된 것을 확인할 수 있다.
2️⃣ 데이터 읽어오기 (Read)
이제 추가한 데이터를 리싸이클러뷰로 보여주려고 한다.
아이템 생성
<?xml version="1.0" encoding="utf-8"?>
<layout xmlns:android="http://schemas.android.com/apk/res/android"
    xmlns:app="http://schemas.android.com/apk/res-auto"
    xmlns:tools="http://schemas.android.com/tools">

    <data>

    </data>

    <androidx.constraintlayout.widget.ConstraintLayout
        android:layout_width="match_parent"
        android:layout_height="wrap_content"
        android:padding="20dp">

        <TextView
            android:id="@+id/id_text"
            android:layout_width="wrap_content"
            android:layout_height="wrap_content"
            android:layout_marginStart="16dp"
            android:text="1"
            android:textSize="40sp"
            app:layout_constraintBottom_toBottomOf="parent"
            app:layout_constraintStart_toStartOf="parent"
            app:layout_constraintTop_toTopOf="parent" />

        <TextView
            android:id="@+id/name_text"
            android:layout_width="wrap_content"
            android:layout_height="wrap_content"
            android:layout_marginStart="50dp"
            android:text="name"
            android:textSize="24sp"
            app:layout_constraintBottom_toBottomOf="parent"
            app:layout_constraintStart_toEndOf="@+id/id_text"
            app:layout_constraintTop_toTopOf="parent" />

        <TextView
            android:id="@+id/age_text"
            android:layout_width="wrap_content"
            android:layout_height="wrap_content"
            android:layout_marginStart="10dp"
            android:text="age"
            android:textSize="24sp"
            app:layout_constraintBottom_toBottomOf="parent"
            app:layout_constraintStart_toEndOf="@+id/name_text"
            app:layout_constraintTop_toTopOf="parent" />
    </androidx.constraintlayout.widget.ConstraintLayout>
</layout>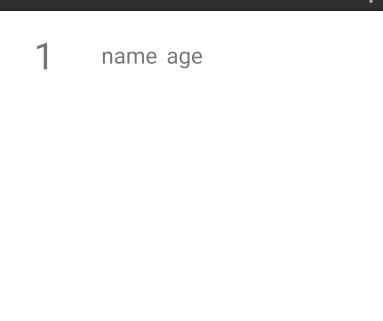
아이템으로 쓸 레이아웃을 생성해준다.
리싸이클러뷰 어댑터 생성
class MyAdapter : RecyclerView.Adapter<MyAdapter.MyViewHolder>() {

    private var userList = emptyList<User>()

    class MyViewHolder(val binding: LayoutItemBinding) : RecyclerView.ViewHolder(binding.root)

    // 어떤 xml 으로 뷰 홀더를 생성할지 지정
    override fun onCreateViewHolder(parent: ViewGroup, viewType: Int): MyViewHolder {
        val binding = LayoutItemBinding.inflate(LayoutInflater.from(parent.context),parent,false)
        return MyViewHolder(binding)
    }

    // 뷰 홀더에 데이터를 바인딩
    override fun onBindViewHolder(holder: MyViewHolder, position: Int) {
        val currentItem = userList[position]
        holder.binding.idText.text = currentItem.id.toString()
        holder.binding.nameText.text = currentItem.name
        holder.binding.ageText.text = currentItem.age.toString()
    }

    // 뷰 홀더의 개수 리턴
    override fun getItemCount(): Int {
        return userList.size
    }

    // 유저 리스트 갱신
    fun setData(user : List<User>){
        userList = user
        notifyDataSetChanged()
    }
}
리싸이클러뷰에 사용할 어댑터를 생성해준다.
onBindViewHolder에서 각자의 정보를 바인딩해주고
setData 에서 유저 리스트를 갱신 해줄 것이다.
2021.05.17 - [안드로이드/기본] - [Android] 자주쓰는 RecyclerView 사용하기 (+ ViewBinding)
[Android] 자주쓰는 RecyclerView 사용하기 (+ ViewBinding)
RecyclerView 는 안드로이드 개발을 할 때 자주 사용하게 된다. 그런데 만들때마다 조금씩 헷갈릴 때가 있어서, 하나하나 깔끔하게 과정을 정리하여 참고할 수 있는 라이브러리처럼 만들어 보고자
hanyeop.tistory.com
리싸이클러뷰에 대한 자세한 내용은 여기서 확인할 수 있다.
메인액티비티
 // 아이템을 가로로 하나씩 보여줌
        binding.recyclerView.layoutManager = LinearLayoutManager(this, LinearLayoutManager.VERTICAL,false)
        // 어댑터 연결
        val adapter = MyAdapter()
        binding.recyclerView.adapter = adapter

        userViewModel.readAllData.observe(this, Observer {
            adapter.setData(it)
        })
리싸이클러뷰에 어댑터를 연결해주고
뷰모델의 readAllData 라이브데이터를 관찰하여 변경시 어댑터 안의 유저리스트를 갱신해주어 리싸이클러뷰를 갱신해준다.
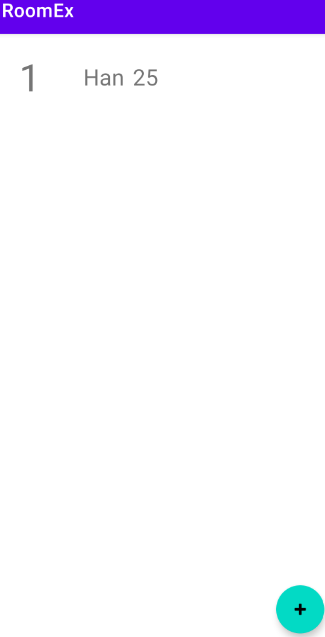
앱 실행 시 아까 넣은 데이터가 보여지는 것을 알 수 있으며
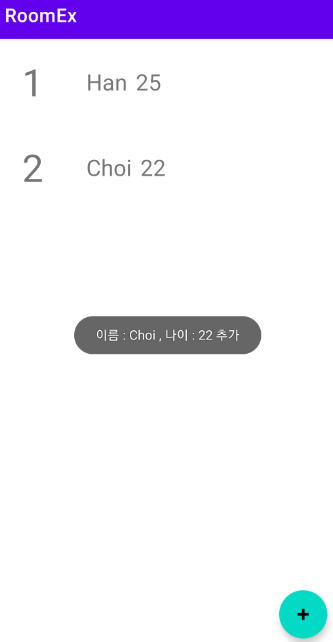
데이터 추가시 리싸이클러뷰가 다시 갱신된다.
https://github.com/HanYeop/AndroidStudio-Practice/tree/master/RoomEx
HanYeop/AndroidStudio-Practice
안드로이드 학습 내용 저장소. Contribute to HanYeop/AndroidStudio-Practice development by creating an account on GitHub.
github.com
참조
https://www.youtube.com/watch?v=lwAvI3WDXBY&list=PLSrm9z4zp4mEPOfZNV9O-crOhoMa0G2-o